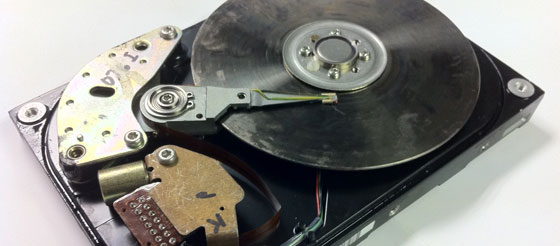
The hard truth is that our good old hard drives are nothing more than a stack of platters spinning very fast, with a magnetic head hovering over them to read and write data.
You are probably using it all the time, day in, day out. And like all mechanical devices, one day a component will wear out, come loose or respond erratically, causing a crash – no explosion or fire but your data will be lost or recovery will be hard and costly.
[box type=”shadow”]François “Frankie” Arnould is a London-based music photographer and graphic designer for artists, make sure you check out his work on www.frankiegoesclick.com and “like” his Facebook page! (www.facebook.com/FrankieGoesClick).[/box]
With that in mind, the only sensible thing to do is setting up an effective backup strategy so that when your hard drive kicks the bucket, the only thing you lose is a bit of time and money.
You don’t want your photo projects, your holiday pictures, your memories or the wedding you shot two days ago to disappear forever, do you? Better safe than sorry.
Read the signs
Like any illness, the sooner the problem is diagnosed, the better the chances of avoiding heavy complications. Common symptoms include : more frequent computer freezes, random files becoming unreadable, general slugginess. I won’t go into details here, but if you are suspecting a HD failure, this website can help you confirm the nature of the problem.
Back me up, before you go-go…
(That’s not funny, I know.)
As for backing up your data, there are many ways of going about it, depending on your needs, the type and quantity of files to be backed up, and your system. In this post, I will humbly try and explain my own strategy with a Mac running Lightroom, and also give useful pointers if you use a different system and/or editing software – the basic principles are exactly the same anyway.
As a rule of thumb :
- Do not keep all your data stored on a single drive only
- Perform backups at least on a daily basis
- Have an extra off-site backup (in case of fire, robbery, etc.)
If you haven’t invested in a second hard-drive yet, do it now. It doesn’t necessarily matter whether it is external or internal, although an external one will give you much more flexibility, and if you only use it for backups it won’t affect performance at all.
Also to be considered (in case both your main and backup drives fail) is a third drive mirroring your backup drive via a RAID array (more on that here), with a device such as the expensive Drobo – it all depends on what you can afford really. But not to worry – these are just options for added security and by no means an absolute necessity.
As photographers, we mainly want to backup our master files with their editing (so we don’t have to do it all over again) and our catalogs. Now I don’t want to get into the whole Mac vs PC or Adobe Lightroom/PS vs Aperture fight, but I have to say that Lightroom and Time Machine (comes with all Mac computers) make my life much easier. Let me show you why.
Prologue : Downloading your pictures
This is actually optional, but it is worth mentioning that Lightroom comes with a very useful feature that allows you to copy your fresh snaps to an extra location upon import into the catalog.
When importing, simply tick “Make a second copy to” and select where you want the files to be saved. You want to do that on your backup drive, of course, the purpose being that if your main hard drive fails before you could do any proper backup as explained below, at least your original files are secure.
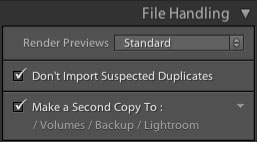
I only use this for very important shoots – as a music photographer, typically after a concert or a promo photoshoot, but for you it may be a wedding or an major event, where the first thing you do when coming home is rush to the computer and quickly get the pictures off the memory card, sitting tight on a hard drive.
You never know. Those files will not be affected by your editing of the master files imported in the catalog, it really is just a first defence measure – not crucial but to be taken into consideration on those critical occasions.
Part One : saving your edited files onto your main drive
This is the obvious prerequisite. But bear with me : there is much more to it than simply letting the software automatically backup the catalog. Remember the catalog and the actual photo files are two different things, backing up the catalog does NOT make your pictures safe. Therefore, it is of the utmost importance that you choose your file format wisely, as that will affect how your edits will be saved.
A bit of background : most of you already know that, but as a serious photographer, pro or amateur, you should be shooting in RAW. A RAW file contains the totality of the information gathered by the sensor and is therefore free of any kind of JPEG compression and subsequent loss of data (even with the highest quality settings).
It makes it much easier to recover blown highlights and adjust the white balance. Seriously, don’t always listen to Ken Rockwell, RAW is the way to go, and I’ll give you yet another reason for it. RAW is not a file format but rather an umbrella term for multiple file formats by different camera manufacturers.
Nikon’s proprietary format is .NEF and Canon has .CR2, for example. And with it comes a very important notion : non-destructive workflow. Programs such as Lightroom and Aperture allow the user to edit a RAW file from import to export without losing any data whatsoever.
It’s a bit like having a digital negative. In order to do that, the software uses metadata, or data about data : it writes down all the modifications in a separate file, called a sidecar, and simply applies it to the digital negative every time you open it.
You can edit as many times as you like without altering the original data. That’s non-destructive workflow for you.
Now with Adobe Lightroom, edits are not always saved up in that little .XMP file (Adobe’s sidecar format), but are instead all temporarily stored in catalogs (or libraries in Aperture). But you may be wondering what happens if you want to transfer one or several files to another computer?
How can you make sure the metadata goes with it, apart from exporting it as a JPEG or TIFF, thus interrupting the non-destructive flow? Two ways : by saving the metadata to the sidecar either manually (select photos then in LR main menu : Metadata –> Save Metadata to File or simply press Cmd/Ctrl-S) or automatically (main menu : Lightroom [Edit for Windows users] –> Catalog settings –> Metadata and tick “Automatically write changes into XMP”).
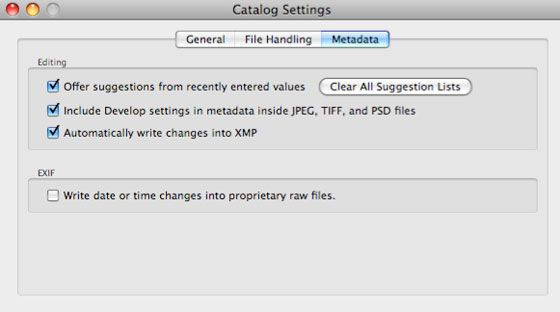
All you need to do then is copy/paste both the .xmp sidecar and the RAW file. What’s more, the “Automatically write changes into XMP” function can be a life saver, although it does decrease performance a little bit as every single minor tweak is immediately written to the hard drive.
The thing is your Lightroom catalog can sometimes become corrupted and unrecoverable for no reason (it happens more than you think), and unless you tick that little box (or manually save the metadata to the .xmp every other minute if you can be bothered), there is no way to recover all your edits in case of a sudden computer crash or catalog corruption.
I guess the only annoying thing (although that can be argued) with RAW + xmp is that you end up with two files instead of one. If for some reason you lose the xmp, all you are left with is the unedited file – back to square one. As unlikely as some may say this is, Adobe came up with their own RAW format, called .DNG (you guessed it, for Digital NeGative).
So what? Well to start with, a .DNG is a bit smaller in size than a .NEF, for example, while still retaining absolutely all of the RAW information (no loss in image quality), and then the metadata is embedded into the file, which basically means a .DNG file is a box with the RAW and .XMP files in it.
So when you save the metadata into the XMP, be it manually or automatically thanks to the “Automatically write changes into XMP” function, it is all written into the .DNG file, never to be separated. You can convert your RAW files to .DNG on import in Lightroom, no hassle, no external application or plugin, easy peasy.

It’s just safer and more convenient. There is (yet another) debate going on about DNG vs proprietary RAW like NEF and CR2, I’ll let you choose where you stand but as far as I’m concerned it’s DNG + “automatically write to XMP” all the way : my files are smaller yet without any loss of IQ and my edits are automatically stored and safely contained within the files.
So now our edits and our files have been reunited to live happily ever after, we also want to make sure we backup the catalog on a regular basis. Lightroom 3 makes this a breeze with a reminder every time you exit the application (in LR2 it was upon starting up the app, which was a bit silly).
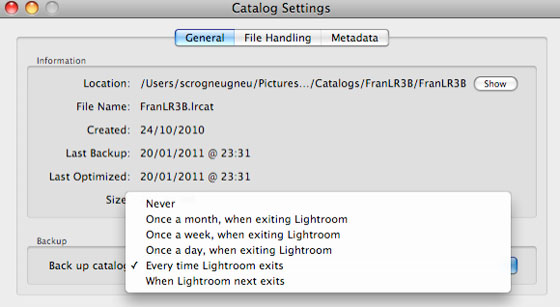
Settings for this can be found in the menu under Lightroom (Edit for Windows) –> Catalog settings –> General. By all means do make sure you tick the option to perform a backup every time you exit Lightroom.
What it does is basically copy the catalog (.lrcat) into a separate folder (very cleverly named “Backups”, usually in the folder where your .lrcat file is, with dated subfolders), check for problems and perform some kind of optimisation. (You can also choose a folder on your backup drive, but that’s not necessary if you make proper backups of the files, more about that further down.)
In case of corrupted and unrepairable catalog (happened to me a few times), all you have to do is open the most recent backup you have, and you’re back in business without any loss.
For any files edited between the date of creation of that backup and the restore date, remember the edits are within the files (the preview may not be up to date but not to worry – just open the picture in Library or Develop mode and all will be normal again, with your edits and all) and if some pictures are missing, just import them again and let the DNG magic happen.
Part Two : Backing up to an external drive
Alright, now your long hours of editing are safe should the Lightroom catalog throw a major strop at you, but what if your hard drive decides to go on permanent strike?
You need to be prepared and regularly get all your work copied to a separate drive (or several drives in case of a RAID array), and -please!- not just once in a while! Repeat after me : I will backup my files at least once a day, I will backup my files at least once a day…
Of course, it is possible to do this manually by copy/pasting the folder where your pictures are stored to your backup drive, but it means that ALL files will have to be transferred every time, overwriting everything. Why is that? Simply because the system (Mac or Windows), before asking you if you want to overwrite duplicates, will only be checking for new files, i.e. with a different name. What happens if you edited an older picture?
Well if you don’t overwrite, it will copy new files only, leaving behind the newly edited old picture, as there is already a file with the same name on the backup drive. Hence the need to overwrite everything.
Now there may be another way, but I must say I haven’t really looked into it as it seems like a painstakingly boring and time-consuming process… and Time Machine makes things so much easier.
Time Machine is a backup utility featured in all Macs since the 10.5 “Leopard” release of Mac OS X. What it does is incremental backups. I couldn’t explain it any better than Wikipedia : “An incremental backup preserves data by creating multiple copies that are based on the differences in those data: a successive copy of the data contains only that portion which has changed since the preceding copy has been created.”.
So basically, it analyses all your files by looking for differences with the previous backup (in size or date of modification, for example), detect the recently modified files and updates the whole backup with the new versions of those files, plus the new files of course. (Windows users can jump a few paragraphs.)
You can set it up so it automatically backs up your whole system, you can decide at which interval you want that done, let it work in the background, etc. but that’s not my cup of tea.
Instead, I set up a backup routine for myself. I chose only to backup important files, and that includes my photos and LR catalogs, of course. While it is not possible to choose what you do want to be included in the Time Machine backup, you can choose want you do NOT want to include, which is basically the same thing (well, duh).
Open System Preferences –> Time Machine (in System) –> Options, then add (+) the System folder, the Application folder, and everything else you don’t want to back up with this method. Up to you, really, but if you keep to your important/unrecoverable files, it will be faster.
As long as you don’t exclude the folder where your photo files and your catalogs (plus their backups) are, your work will be safe.
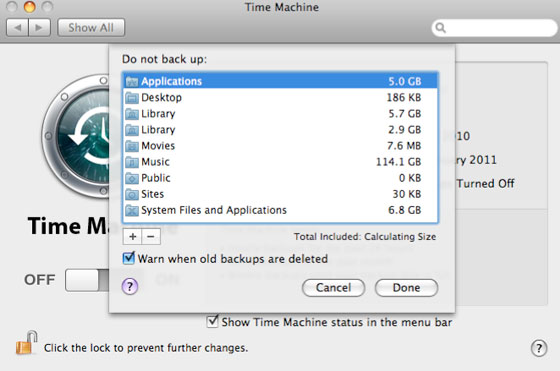
As you can tell from the printscreen above, I also turned Time Machine off. Why? Because I want to be able to choose myself when I do my backups (it is part of my routine) and that would be after any editing session at least once a day (usually in the evening, actually). It couldn’t be any easier : OS X also gave us a nifty little icon in the top right corner, click on it and there you go – a “Back Up Now” button.

This will perform an incremental back up on everything that is on your hard drive except the folders you specified you did not want to include in the backup. In my case, this means that all my personal documents are also backed up, on top of all my photos (DNGs in all their edited glory), my catalogs and the backups of my catalogs.
Obviously, you want to set up your external drive as backup disk in the Time Machine main menu, but that goes without saying. Anyway, if anything goes wrong with my main hard drive, I will not have lost anything.
For Windows users : I am not very familiar with Win7’s backup utility – some people say it does incremental, some say it doesn’t, anyway as usual everyone would be better off staying away from Microsoft products (I may get in trouble for saying this!
Please don’t poo in my letterbox!) and reach for an independent solution such as Altaro Oops!Backup for Windows, which apparently performs very well, is reliable, and quite a match to Time Machine. And it’s cheap (£29 in the UK). There may be lots of other options out there, perhaps free ones, but I’ll let experts give their recommendations. You saved a lot of money when buying a PC instead of a Mac, surely you can afford a little life-saving piece of software now.
Epilogue : happily ever after?
Every evening I go to bed knowing that all my precious files are safe. When I’m done working, sorting, editing, exporting and all that, I close Lightroom, let it do the catalog backup, then save all my photos and catalogs onto my external hard drive by clicking “Back Up Now” under the little Time Machine icon, hit the sack and and sleep like a baby.
It works very well and saved the day on a couple of occasions already. All together, it takes a couple of minutes. Now my little routine here is what I consider the strict minimum and is actually quite basic compared to some people’s strategies.
Other things you can do include having another backup drive off-site (that is actually a very good piece of advice, after all a hard drive failure is not the only thing that can happen to your data… how about a fire or a robbery?), or burn DVDs if you have way too much time on your hands.
This was just one way of going about it, I’m sure many of you have different strategies, perhaps much more efficient than mine – feel free to share the knowledge with everyone!
Frankie
www.frankiegoesclick.com
Have you tried doing a reinstall by restoring from TimeMachine?
I did that – swapped HDs in the macbookpro just before Christmas. Last thing I did on the way down, `run backup now’ in TM. So how come, when I told it to restore from TM backup, some directories of stuff were last modified in September?!?
Fortunately, I have my own backup script, using rsync, which I leave running every *hour*. And more importantly, now that I have the notebook restored to something usable, I’m backing-up almost all the whole box using my script, not just my homedir and photos.
Nice but readers should not forget that it does not prevent from thieves, fire, … Of course, backupping on a different physical disk is the minimum for a photographer but such a backup system should be coupled with an off-site backup system such as cloud backup services.
I did mention it in the last section and in the beginning 😉
“Other things you can do include having another backup drive off-site (that is actually a very good piece of advice, after all a hard drive failure is not the only thing that can happen to your data… how about a fire or a robbery?), or burn DVDs if you have way too much time on your hands.”
I must admit that I have not read the full article ;-). You should write a new article on that topic, I find it as important (or more than) as the hard-drive backup. 🙂
A time machine in a different room… wirelessly backs up… not quite off site, but a goood start…
Excellent article..as I have recently moved I am reevaluating my workflow and backup systems. Thanks
2 NAS RAID5 (1 at home and 1 at the office), 1 HDD always with me, 1 TimeMachine backup, backup to the Cloud in realtime from one of the two NAS, copy of all my works on regular HDD in another location.
Am I paranoid? 🙂
Hey. Great article. Im just trying to figure out my workflow… do you end up del your files off your main computer once your finished with them and just leave the working folders in tact?
Frankie,
I can’t tell you how grateful I am for this excellently written article! I am transitioning from Aperture, as it is no longer supported by Apple. I have spend HOURS and HOURS reading books, opinions, online tutorials on how to get Lightroom 6 launched and working for me. (I used LR5 briefly last year, until I unknowingly deleted my master files, and became so thoroughly spooked that I abandoned LR altogether.) But now I am committed to understanding and mastering the basics. The develop module I enjoyed on my first go-round, but it is the import and file management aspect that is so hard for me to grasp. Tutorials on backing up are terribly confusing. I have long used time Machine for everything on my Mac except photography. Online tutorials often caution NOT to use TM for fear of corrupting the LR photos and lrcat. I kept thinking that if I manually turn on TM to back up LR, all will be right with my world. You confirmed this. And your illuminating commentary on DNG and xmp files was exactly what I needed to know to move forward. I can’t thank you enough!
I keep all of my photo files on a standalone hard drive. How do I go about backing that up to another hard drive??
Thanks
You could use software like Carbon Copy Cloner, which allows you to clone external and internal drives.
Really helpful, and useful contributions too. My LR catalogue when I look at it via Windows Explorer doesn’t seem to have any updates since 2015, but has been used a plenty and holds all the current edits. Anyhow, backing up to 3 different HDDs manually and find it excruciating! Great advice. Will follow.