Love them or hate them digital watermarks are commonplace on photos shared over the internet. From large copyright symbols that nearly obscure the entire image to more subtle corner marking can can sadly be easily cropped photographers feel the need to protect their art.
There are a number of solutions to adding a custom watermark to each of the images you export. My workflow of choice is the LR2/Mogrify plugin for Lightroom. This might sound complicated but it really couldn’t be easier to install and use.
This simple tutorial will take you through the steps for adding customer watermarks automatically in Lightroom 2.

LR2/Mogrify is a post-process plugin for Lightroom 2 and later that can embellish your images as they are exported from Lightroom. It’s flexible interface allows you to add outer and inner borders, watermarks and text annotations to your images.
Step 1 : Create your watermark file.
In this example I used Photoshop to create an image 200 pixels wide by 20 pixels high. I selected a font I had used my other literature and simple typed © FlixelPix.com
It is important this image is saved with a transparent background. To create this simple un-tick the “background” layer of the photoshop file. Your watermark file should look a little like this one.

Now, click File, and “Save for Web or Devices” and save the file as a PNG this will ensure the image remains transparent. I suggest you create a folder entitled “watermark” in your main documents folder and save the watermark file to it.
Step 2 : Install the plugin
LR2/Mogrify is donation ware. This means you can use it freely but your exports will be limited to ten at any one time. If you want unlimited exporting capabilities simply make a donation (possible from within the plugin window).
Head over to the LR2/Mogrify website and download the plugin.
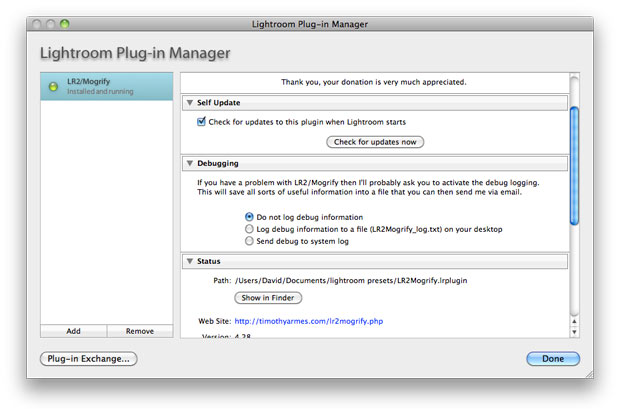
Load Adobe Lightroom 2 and click the File menu then “Plugin Manager” When the window opens click “Add” and locate the plugin file (previously downloaded).

Step 3 : Exporting your images
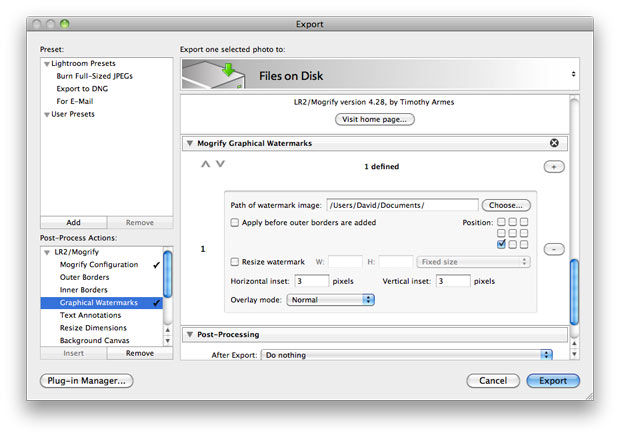
The next step is easy. Click on the photo you want to export and click the export button. When the export dialogue loads you will now have new panel options. Click the activate the “Graphical Watermarks” option.
Now click “Choose” to locate the image of the watermark file you created in Step 1.
 I would also recommend adding a horizontal and vertical offset so your watermark isn’t pressed against the corners of your image.
The plugin allows you to set where you want the watermark to be located. As you can see in the screenshot (and the image at the top of the post) I add mine to the bottom left of each photo.
Simple. It would be interesting to hear you opinions on watermarks in the comments below. Essential protection or photo killer ?
Great tutorial. Mogrify is a superb addition to the arsenal though I agree with your current state assessment on watermarking in general. Of course Mogrify does a lot more and is worth a modest donation 😉 Of interest aswell is that LR3 integrates this Mogrify blending option for watermarks too.
Finally, watermarking can be embedded in the image without crass overlays by placing tracking bit patterns in the image which cannot be removed by conventional means (i.e., using bit patterns spread throughout the image using public/private key encryption).
Great post, keep’em coming!
Thanks for this.
BTW, I’ve added you to my ‘Lightroom Links’ page: http://bit.ly/4XuaXE
Mike.
Boy this is tough. I watermark and post up low-res shots, hoping that either someone will choose easier prey or remove the watermark and disappointingly discover that the lifted pic isn’t even suitable for wallpaper. IMO, as much as I think it detracts from the picture it’s an unfortunate necessity when so many people think that pictures should be free and have no conscience about taking someone else’s work.
Stephen, could you expand on what you mentioned in your last paragraph – watermarking without overlays?
Watermarking, as I’ve described it, generates a globally unique identifier that’s specific to you (it might be based on your URL or Copyright notice). It’s converted to a pixel map and distributed at various points around the image – chosen randomly but specific to you based on a key you generate. You can check the authenticity of the watermark by validating it against your key. Now, I’m not sure what happens if someone resizes the image materially, but I think the tools handle this aswell.
The watermarking resources I have are…
DigiMarc
https://www.digimarc.com/solutions/images/
Alamoon
http://alamoon.com/
^ Thanks Stephen
Thanks so much, I appreciate this!
Thanks for this. I got to make this a part of my workflow!
Brian Carey
is it the same for LR3?
No, LR3 has it’s own inbuilt watermarking features now. They’re available as part of the image export and printing modules. It’s extremely easy to use and is highly configurable. This functionality replaces the watermarking capabilities of Mogrify in LR2 completely.
Does anyone have a gallery at Smug Mug and if so how do you handle watermarking when pics are for sale? How do you watermark for pictures that you sell to people? Do you sell prints with copyright?