I have been using Lightroom for a number of years and it never ceases to amaze me when I discover new tools, shortcuts and functions. Over the last week I have been watching the a series of video tutorials by Laura Shoe that have opened my eyes to a powerhouse of function I hadn’t discovered. Here are Laura’s top tips for getting the most from Lightroom.

- 1. If you find an image but have no idea what folder it lives in, just right-click on the image and select Go to Folder in Library. The folder will become selected in the Library module.
- 2. You can delete images in Lightroom, but not folders. This is Lightroom’s way of protecting you, since there could be files in the folder that you would otherwise unknowingly delete because haven’t been imported into Lightroom. You can, however, delete a folder by right-clicking on it, selecting Show in Finder/Explorer, and deleting it in the Finder or Explorer window that pops up. But make sure it is really empty first! Then back in Lightroom, right-click on the folder and select Remove.
- 3. Get out of the habit of making copies of your files. Where you need two different versions, right-click on the image and select Create Virtual Copy. This virtual copy is just a second set of instructions for your one file, rather than a second physical copy.
- 4. Can’t remember why you created all those virtual copies? Document the purpose in the Copy Name field, which you will find in the Metadata panel in the Library module. Then, as you hover over an image in the filmstrip, the copy name will show after the file name.
- 5. If you are assigning images to a collection, right-click on the collection and set it as the target collection. Then when you find an image you want to assign to it, instead of dragging the image to the collection, just select the image and type the shortcut B.
- 6. For any slider in Lightroom (such as Exposure), double-click on its name to reset it to its default.
- 7. In the adjustment brush and graduated filter panels, double-click on the word Effect in to reset all sliders to 0 at once. Double-click on the word Color to turn off painting with color.
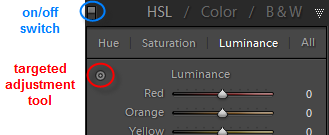
- 8. Each panel in Develop except the Basic panel has a switch to the left of the panel name. Click this switch to toggle on and off the changes you have made using that panel. You will also find a switch in all the tools — crop, spot removal, red eye, adjustment brush and graduated filters.

- 9. That little target circle to the left in the HSL/Color/B&W and Tone Curve panels is the targeted adjustment tool. Click on it to grab it, then click, hold and drag up or down in your image to affect the color or tone that the tool finds under where you click and drag.
- 10. In the crop tool, the shortcut X will flip your crop from horizontal to vertical and vice-versa.
- 11. In general, use shortcuts. They will make your Lightroom experience flow more smoothly and speed up your work. My most used shortcuts are G for Grid to get to the Library module and D for Develop. Next would be the \ key to toggle before and after in the Develop module.
Here is a one page list of Laura’s favorite Lightroom shortcuts, from her new DVD.
[box]About Laura’s DVD, Lightroom Fundamentals: Workshop on DVD:
· Over 6 1/2 hours of instruction on 36 videos
· For beginning and intermediate Lightroom users
· Available as a download or DVD[/box]
Understand how Lightroom works and how to make sure that everything important is well-organized and backed up, then master the techniques of importing, organizing, evaluating, keywording, and finding your photos.
Go on to understand in-depth the tools available in the Develop module to fix and enhance your images and how to use them in solid workflow, and finally, how to export copies of your images to share with others. Click here for more information and to purchase.
What people are saying:
“I’ve watched the first 8 videos so far, and am very impressed. … Your DVD’s are well presented and very clear. Things that didn’t quite gel before are doing so now. The best LR resource I have found so far. Eat your heart out Scott Kelby!” J.B.
“I was thrilled to get the notice that your DVD was ready. I purchased it immediately and within minutes, I was viewing the lessons. So well done. An invaluable tool. Thanks so much!” L. M.
A key area I’ve been using lately for people shots are the brushes. As I teach Lightroom, this is an important correction toolset that I have used extensively. But, I only learned from one of my students about the preset brush tools supplied in the newer versions (Teeth Whitening, for example). It took some hunting to find out why my Lightroom didn’t have them and hers did. I made the mistake on my upgrades to say “No” to restore presets for the Local Adjustments (and some other things). By going into preferences and restoring Local Adjustment Presets, I have the five missing brushes. They are really, really useful (Burn, Dodge, Iris Enhance, Skin Softening, Teeth Whitening). These are critical for editing wedding photos in particular.
After finding the brushes, how to you put them into Lightroom so they can be used?
Please explain in greater detail how and where the prestes are after you went into preferences. Does changing the preferences alter any of the photos or just make the presents available.
just recently, when i go to develop my pics, the colors of each photo have gone crazy with anything very dark turning a bright blue, and anything overexposed turning a bright red. i don’t remember altering any settings (that i know of) and can’t figure out how to get rid of these crazy bright accents so that i can develop any pictures normally. can you please help me? the program had been working beautifully up until a few days ago…..
Kimberly, when you are in the Develop Module, the keyboard shortcut “J” will turn on or off the Over/Under exposure warning. This is what you are seeing with the blue and red overlay.
On the histogram in the Develop Module there are highlighted boxes at the top left and top right when this is active. Hope this helps.